Monday 9 December 2013

UK Scrappers Christmas Blog Hop 2013

Hello one and all. Today I’m posting a project as part of the UKS Christmas Blog Hop.  This post is part of a blog hop over at UK Scrappers, where from 1st December until Christmas there is a project every day. 

The rules of the hop are:
  1. Visit the UKS Home Page every morning where you'll find a new project - from there, click the link to get the tutorial for that day.
  2. Comment on each of the blog threads uploaded each morning (and BE SURE TO MENTION YOUR UKS USER NAME in your comment). If the project is not on a blog, you get a PASS.
  3. And then comment on the UKS thread, but you only need to comment in the UKS thread after the 23rd of December, and if you have commented on all the blogs. We will compare the commenters in the UKS thread to the blog comments after the 25th and announce the winner on New Year's Eve.
How exciting!

So, welcome to Day 10 of the UKS Christmas Blog Hop! 

We hope you enjoyed yesterday’s post, the lovely hanging star decoration by Niki at Being Scrappy.

Sir Stampalot’s project today is using one of the amazing Sizzix ‘flip-it’ themed framelit sets.  I taught it at an instore class recently and it went down very well. So hope you like it too.


Firstly, die cut all your pieces so you are ready for the off :)


Now let’s do some stamping.
Stamp in black and clear emboss 3 Christmas motifs in the centre of each of the white squares.  I’ve then coloured my images in with copic pens.  I’ve also used glossy accents on the bauble (ensure you leave to dry) and also used white liquid applique on the stocking top, heal and toe. 


Also stamp in black and clear emboss the Happy Christmas sentiment on the bottom right of the big rectangular patterned cardstock.
Also stamp in black and clear emboss a stitching stamp down the left hand side of the other piece of patterned cardstock that will be used on the front of the card.
Then finally, I’ve stamped the For: and From: onto 2 of the 3 die cut squares to be used on the “inside” flip of the card.


Now to put it all together :)
Adhere with double sided tape or cosmic shimmer dries clear glue, all the die cut pieces of patterned paper as pictured here:


And there you have it! How quick and easy was that!

If you like the look of the flip-it framelits, you can check them all out here: Flip-It Framelits

if you wish to make some cards without purchasing the framelits set, or because you don’t yet have a die-cutting machine, you can purchase the kit here (makes 3 cards and you get 2 stamps included too) :  UKS Card Kit.

And if you don’t already have small any Christmas motifs toppers or stamps in your own stash, to fit the squares, I’ve used the Stampendous Tag Art “set Holiday” which we currently have in our sale section and fit perfectly.

Well, that’s all for today folks.  Hope you enjoyed it and thanks for looking.

Be sure to visit Suzy’s blog tomorrow where she’ll be making a Christmas card too.

For a complete list of all projects that have already been uploaded this December, check out the listing here : UK Scrappers live blog hog listing.

Happy Crafting, and Merry Christmas to you all!
Janice and all at Sir Stampalot
x

Sunday 24 February 2013

Teresa Collins Noel Album by Lisa

Hello everyone, after several of your requests to see more of Lisa's class project for the Teresa Collins Noel Album after we'd mentioned it on facebook, here it is :)

Most of of the materials she used are in the kit, the additions include black bazzill card for matting the photos and cricut cut outs to add extra festive embellishments.

Here's the front page:

You could even use the decorations from the outside of Christmas crackers in your crafty projects too:

Once Lisa had cut all the 12x12 pages included in the kit to the same shape as the outside covers of the album from the kit, the fun job of embellishing can commence!
Lisa loves her hidden pockets for popping in tags for journing, extra photos or just as is:
as well as a cool hidden area!

Really love this blocked look on the left hand page. Cut up offcuts into squares and rectangles, ink the edges if you so wish and create a mosiac look:

Cool borders, pockets and rosettes:
This rosette is easy to create, use a strip from the offcuts of cardstock, then a border punch all the way down the strip (Lisa had used the Woodware ribbon crafty edger design here), create an accordian fold all the way down the strip matching up with the ribbon slot designs. Fold the mountains and valleys, then adhere the two ends together. Fold flat and pinch together to create a rosette design. Where there's a hole in the middle, cover with something cool and coordinating.

Lisa has too much fun playing with pockets and tags!
Lisa used 2 nesting sized circle cut outs and an eyelet along with some twine, to create her own closure on this cute envelope:
And she's used offcuts from the cardstock to create a collaged pocket:

More cool ideas on these pages:
Just check out the black ribbon and white buckle used here on the page edge, looking just like santa's belt buckle:

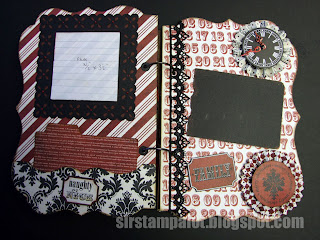
Some different ideas on this next double page:
The ribbon included in the kit has been used to create a ribbon board, so you can slide in tags, photos, journalling, memorabilia:
And Lisa has embossed some cardstock to use as a photo mat, and used metallic wax rubons to highlight the embossed areas:

Here's some blank pages ready to decoarte:

and then the back cover including name of the creator. The album is then held together with the book rings in the kit and offcuts of the ribbon from the kit to embellish the book rings:


Hope you all enjoyed that. Great project to adapt for any occasion.
Enjoy!
Until next time....

janicex

Friday 11 January 2013

CHA

The start of yet another year – which means only one thing in the crafting world – CHA. Yes, that fabulous trade show starts in earnest tomorrow.


We’ve already been finding loads of goodies that are worth checking out. Due to the popularity of Pinterest, we are trying something new this year and reporting our research on our own CHA 2013 Pinterest board.

You can find it here: CHA 2013 Pinterest Board
 
 I’ll be adding more ‘pins’ over the next 4 days so please check back again using the above link, to see all the new stuff being released.

 - janicex