Showing posts with label graphic 45. Show all posts

Monday, 11 September 2017

Graphic 45 Christmas Envelope Album


Louise here!  It's only Sept I hear you say but I know lots of you are already thinking about Christmas cards and Christmas presents.  So I thought I'd share pictures of this mini Christmas album I made for a class we had at Sir Stampalot.
This would make a lovely keepsake to give to someone at Christmas for them to keep their special photos in thay they take over the festive season.
The front and back cover of this album is made from chipboard cut to 10cm by 16cm.
The papers used in the album all come from one 8x8 Graphic 45 pad called 
'Twas the night before Christmas'
Unfortunately this collection is now discontinued :(
but the format and layout of this album would work wonderfully with any paper collection - festive or otherwise :)


The pages in this album are actually envelopes created from the We R Memory Keepers envelope board and I have used one sheet of 8x8 paper for each envelope.
I have made four envelopes in the 3 1/2" by 5 1/2" (gladstone) measurement in patterned paper.
You then need to remove one of the short edges flap, then glue the rest down like you would a normal envelope. This will create a opening for your tag to go in.


I have made two 4" x4 "envelopes in black card and cut the one shorter edge the same as before.
This time I saved the piece that I cut of and punched a border along the long straight edge and then glued it back onto the front of the envelope. This creates a pretty detail to the envelope.


I have used postcards and tags all found within the paper pad to create pockets and pretty details through out the album.


Six tags have been die cut from the Tim Holtz tag collection set to slip into the open end of the envelopes, I did need to cut off a little bit of the length so that they did not stick out to far.
I added a little ribbon to each one.


Where I added a picture cut-out, or made pockets, I matted and layered with black card to make them stand out more.


The whole album is bound together using a Zutter book binding machine and with 1 1/4" wires.
You do need to think about where the holes will be when decorating each page so that you are not ruining a page by punching straight through a decoration with the bind it all machine!


I tied some off-cuts of ribbon around the binding wires to finish the album.
I have also added a little stocking charm tied on with string to the wires.

Products used include:

Zutter Bind It All


Tim Holtz Tag Collection

We R memory Keepers Envelope Board

Holly Punch Around Page

Chipboard
Black Card
Twas the Night 8x8 pad

Friday, 25 August 2017

G45 Secret Garden Mini Album


Today we have a mini album made by me (Louise) using Graphic 45 papers from the
Secret Garden collection.
The papers in this collection are beautiful and this mini album was made using just one 8x8 paper pad.
The Graphic 45 pads have what they call their 'signature' page, which is the main page depicting the whole colletion theme.  I used this signature page for the front and back of my album.
The album front and back covers are cut out of chipboard and measure approx 10cm by 16cm, the papers are cut a little larger so they cover the sides of the chipboard.


Each of the pages in the book are made from one sheet of the 8x8 paper.

I have used the We R Memory Keepers envelope punch board and made envelopes out of each piece of patterned paper.
In total I made 6 patterned envelopes using the 3 1/2" by 5 1/2" measurment which is marked Gladstone on the board itself.


I die cut 6 large tags to go in each envelope from the Tim Holtz tag collection die set.


In the 8x8 paper pad there is several pages that have lots of pieces you can cut out and use for tags and to make pockets, like I have done on the left hand side page.


The papers in this pad are so pretty and there are some little word cut out pieces you can use to decorate your pages too.


All the pieces that I have cut out, I've then used the Tim Holtz tea dye distress ink colour to ink around the edges.
I have also mat and layered these cut out pieces on ivory card so they stand out against the patterns of the base envelope and also inked those edges of the ivory mats too.


I have made lots of smaller tags too and little pockets feature throughout the album.


To finish and bind the album, I have used a cropadile punch and punched holes in all pieces so that I can put them all on two book rings to create the book. You do need to carefully align your pieces and also remove large tags from envelopes because you do not want to catch any when you punch.

When you are decorating a album like this it is worth always bearing in mind where you place decorations and try to avoid where you will be punching holes.

I have then added a selection of ribbons and lace to the tops of the tags throughout the album, great for using left over bits and bobs.

I really enjoyed making this album because it was a fun project without being too large a task.  It would be perfect made in any of the other Graphic 45 paper collections for a little gift, maybe for a new baby or a wedding keepsake.


Products used for this mini album, include: 
Scalloped Tag by Magnolia
Cropadile
WRMK Envelope Board
Tim Holtz Tag Die Collection
2mm Chipboard
2mm Chipboard
Silver Book Rings
G45 Secret Garden 8x8 pad
Tea Dye Distress Ink
Ivory Card

Thursday, 2 March 2017

Window Box


Today we have another beautiful card by Sara using Sue Wilson dies.
Sara has created a lovely window box scene and even used acetate in the windows to give the look of glass.
Striped paper has been used to create a blind in the window and a punched border gives the blind a decorative finish.
The flowers have been decoupaged and pearls used for the centres.
The base of the card is a 8x8 card blank and adhesive pearl border is used around edge.
Another layer is added to card using the Martha Stewart punch around the page eyelet punch, then behind the window a piece of white card as been embossed with a brick wall folder.
The window is attached using foam pads.
Products used-
Sue Wilson die CED22002 Window shutter and valance 
Sue Wilson die CED22001 Arched window/door
Sue Wilson CED22003 3D window and accessories
Martha Stewart punch around the page - Eyelet Lace
Woodware pearl border

Monday, 27 February 2017

New Home


Hello, I am back today with a New Home card made by Sara.
Sara has been playing with the new Sue Wilson dies and come up with some fabulous cards.
The Sue Wilson Arched window/door die is the centre of this card and by using black
brads Sara has added door knobs for extra detail.
The topiary trees have been cut out several times and the green part folded in half and several stuck together to create a 3d look.
The plants, cat and butterflies all come from the Sue Wilson set called 3D window box and accessories, I love the little cat waiting to go inside.
Products used are-
Sue Wilson die sets- CED22003 3D window box and
Card craft card blanks 8x8
Cafe Parisian paper pad
Peeled Paint distress ink pad
Antique Linen distress ink pad
Rusty Hinge distress ink pad

Monday, 11 April 2016

Graphic 45 "Voyage Beneath the Sea" Mini Album


Lovin' this album created by Mandy Gilbert using one of the latest collections from Graphic 45 - Voyage Beneath the Sea.  The album has been made from scratch using the gorgeous G45 collection, a couple of sheets of 2mm chipboard (for the covers) and cream cardstock (for the base pages).

Here's a look at the cover:

Mandy has kept it clean and simple.  She's used Kraft Tex embossed with a snakeskin design embossing folder for the closure wrap and a Tim Holtz hitch fastener to secure.

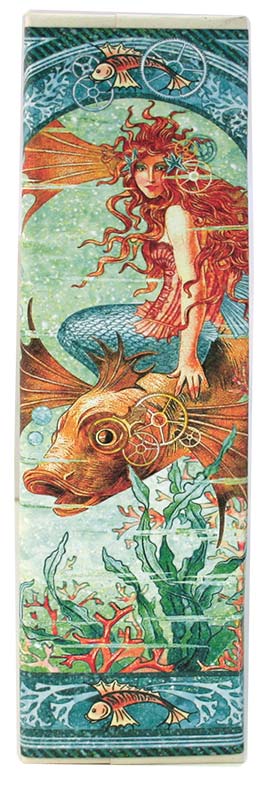
Mandy has covered the spine of the album so that the mermaid riding the fish, signature page design is prominent:


The Tags and Pockets from the Voyage Beneath the Sea collection is dotted about all through this album so there's plenty of nooks and crannies that have been created to house them all. 
And the ephemera cards are also dotted throughout the album with cream photo mats and tabs made from the EK success punch "real estate sign"

INSIDE FRONT COVER
Here's the inside front cover:


Mandy has created a belly band going down the page, on the left hand side and a pocket page on the right hand page.  The same EK success punch "real estate sign" that was used for the photo mat tabs (folded in half), has been used to cut a decorative notch for the pocket page.

PAGE 1
Page 1 double spread uses a horizontal belly band with one of the tags used as a stopper. And on the right hand side, Mandy has included another pocket page.
A lovely feature Mandy has used throughout the album, is a secret photo mat between the pages.  You can just see it here where the tab of the secret page is a punch out of the main page and inked around the edges - can you see it on the top left hand part of this page?  Once you look at the photo mat and then pop it back in the album, it aligns with the main page and becomes camouflaged - something different and very cool, isn't it?

PAGE 2
For the next double page, Mandy has gone with a little slit pocket on the left hand side and a corner pocket feature using one of the tags on the right hand side:
PAGE 3
Page 3 features a corner pocket using one of the tags and the right hand page features a beautiful waterfall feature.  The holding point is one of the ephemera cards with a ribbon pull and magnet to keep it all closed up.
The designs on the waterfall sections have been created using the smaller patterns from the 6x6 paper pad.
PAGE 4
The fourth double page spread includes a horizontal belly band on the left, and also a slit pocket on the right.

PAGE 5
The left hand side of the fifth double page spread features a stacked double pocket.  The right hand page has a small pocket using the spellbinders die labels seventeen and cut in half - it's a great way to use your dies in a different way and get the most out of them.


INSIDE BACK COVER
The final double page spread on the inside back cover features another horizontal belly band with tag stopper.  On the right hand side, is an additional pull out section to hold at least 8 photos and also acts as a pocket to hold more tags :)


This is just an amazing album and is on the counter in the Sir Stampalot, Peterborough shop for you to look at when next visiting :)
Mandy is teaching this project as one of our fabulous “weekender” sessions, here at Sir Stampalot this weekend and repeating the project later in June :) 

Absolutely beautiful. Thanks Mandy.

Enjoy!
Until next time....

janicex

Tuesday, 20 October 2015

Graphic 45 Artisan Style Album in a Box


Mandy Gilbert has made this special box and album completely from scratch using mainly Graphic 45 Artisan Style paper pads , chipboard and black card.

The design of the box is unique and works beautifully with the papers.
 4 Claw feet by Graphic 45 are used on the base of the box
and a set of two Graphic 45 Door knockers are used on the sides of the box lid.
Black card is used through out which really brings the colours of the papers out.


On the first pages mandy has used a pocket and tag from the Artisan Style

Mandy has also made some tags using Thinlits die set - Banners Fancy.  And created the pocket fronts using the negative part of the die cut from Spellbinders Belly Band One.


At the top of the photo above, you can see the box base and lid.
On these pages we have more tags and a belly band.


Mandy has created two pockets with the beautiful papers on the left hand page above
and a fold out page on the right page.


Lots more pockets and flaps to explore again on these pages
and each back to back page as a pull out large tag placed inside,
great for the large photos or a bit of journalling. All these pull out large tags have been edged with the lovely Spellbinders Bracket Borders #1 die.


All of the papers in the Artisan Style Graphic 45 pads match perfectly and some pages have 
bits that you can cut out to use for tags and pockets.  I like the way Mandy has also created special tags using Thinlits - Pocket Card and Geo Tags and the Thinlits set - Basics by Rachael Bright.


Mandy has used a corner punch on some of the black bases for photos
and added a tab using a the Ek succcess punch 'for sale'.


Throughout the album Mandy has used small magnets and made lots of 
pockets and flaps to explore that would be perfect for photos and journalling.

Also used in the album are cards from the coordinating ephemera pack, this is a pack of 32 cards 
with images on that match perfectly with all the Artisan Style papers.

 There is so much more to each page than I can describe to you
 and this album would make a stunning gift for someone special,
 that's if you could part with it after you had made it :)